Welcome to the Larimer County Community Development Customer Online Portal Help Center
Please select a tab below to help guide you through any questions you may have. If you have any questions or concerns that are not in one of the options below, please contact the Community Development Department at 970-498- 7700.
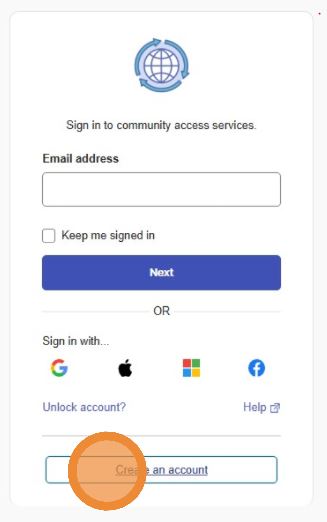
At the bottom of this window - Click Create an account. (Note: You may need to click this button twice)
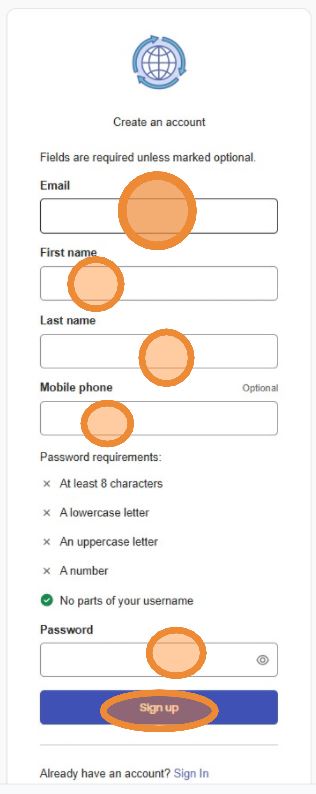
Fill out the account information - if you had a previous account on this site, you'll use the same email address. Select a password that meets the listed requirements and click Sign up.
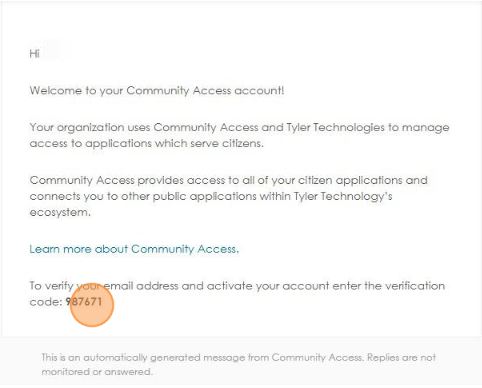
In a different tab/window - Check the email you used to sign up for an email with the Subject Line: "Welcome to your Community Access account" - and copy the code from the message.
Go back to the Online Portal, Click on the "Enter Code" field, Paste or Enter the Code, and click Verify.
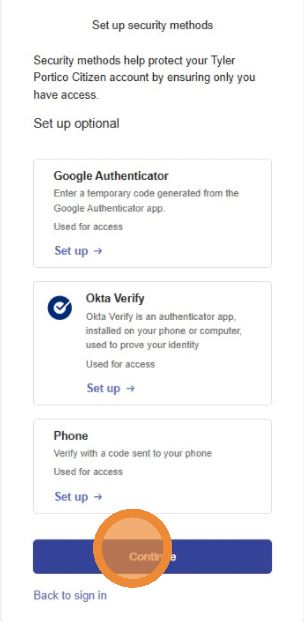
When prompted to set up two-factor authentication, you can choose one of the options or simply Click "Continue" to bypass this setup.
On the following screens - follow the prompts and fill out the contact information.
Check the box and Accept to move forward.
Fill out your Name
Contact preference should be "Email"
Enter at least one phone number
Click Next
You'll be asked to fill out your contact address.
Once finished, click Submit.
Congratulations! You will be taken back to the Online Portal and see your name in the top right-hand corner of the screen.
Video - CSS Search Functionality
Written Directions - CSS Search Functionality
Select Search then change the dropdown to match what you are searching (permit, plan etc.). Once you choose which search type you are looking for the option for Advanced search will populate. Select Advanced.
Other Tips: Click Reset to clear the entered search criteria. Click Advanced to hide the search criteria.
Select the feature to sort the plans in the list by (Relevance, Plan Number, Project, or Apply Date) from the Sort dropdown once results display.
Video - Apply for a Permit Online
Written Directions - Apply for a Permit Online
1. Go to onlineportal.larimer.org
2. If you do not have an account, please click on “Register”. If you have an account, please click on “Log On”.
3. Click the down arrow next to Apply and select the Permit that you would like to apply for
4. Location – Add the location where the work is to be performed
Click the + sign
On the next screen:
Selection LOCATION for address
Enter ONLY the street number and first letter of street name
Select the correct address and click APPLY
NOTE: If you are searching for the address correctly and unable to get the address to populate, it is most likely not in our jurisdiction. Please check the https://www.larimer.gov/assessor (Property Records, Enter Address, Look at Tax District for jurisdiction information). *If you choose to enter the address manually, do not pay at submittal, until we can verify the jurisdiction.
5. Select Next - Add the required permit details - Select Next
6. Click on Add Contact ● Applicant - The
Applicant - The system will automatically add you as the applicant
Owner - Click Add Contact to add the Homeowner - Search by last name ○ The system will search our database for the contact. If the name doesn’t exist, enter it manually
If entering manually, fill in all required fields and click submit
Company - Search the company performing the work/pulling the permit ⭐ FAVORITE A CONTACT - When searching, make sure to click the star to save as a favorite contact
7. Click Next and fill out all “Project Info” fields that pertain to your permit.
8. Click Next and do not add any attachments, click next
9. Review - This screen allows you to review everything you entered. Go back to make changes or click submit.
10. If submitted successfully, you will see this screen:
11. Pay Fees - Click on Add to Cart to pay the fees
12. Within 3 business days the Building Division will process the permit and you will receive an email stating the permit has been issued.
13. PERMIT DOCUMENTS - Log in to the portal, click on the permit number, go to Attachments and print permit documents.
Troubleshooting Errors:
Make sure all required fields are filled in.
Make sure you have a Contractor, Applicant and Owner.
This site is designed for new and existing users. It includes videos and written directions to help customers learn to use the new Customer Self-Service Portal.
Customers can now easily search Community Development records (Building or Planning) or apply for a building permit all online at: